Decorative Plant Stakes Laser Cut CNC: A Practical Guide for Creators and Gardeners
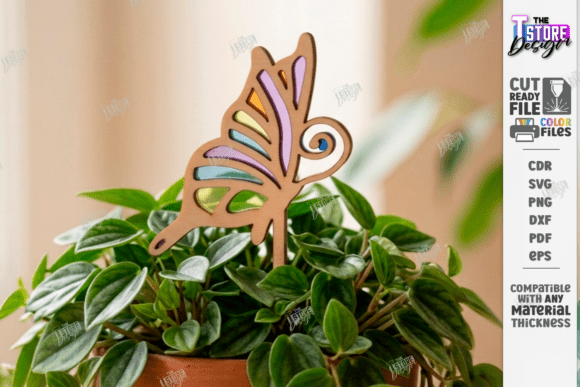
The intersection of botanical beauty and digital craftsmanship has given rise to a fascinating niche: Decorative Plant Stakes Laser Cut CNC. These whimsical markers, often featuring faux stained glass styles with mushrooms, butterflies, snails, and caterpillars, have become staples in nurseries and home gardens alike. For makers, small business owners, and plant enthusiasts, these designs offer a unique way to personalize green spaces. However, the path from a digital file to a polished physical product is paved with technical nuances that can easily trip up even experienced users.
Many creators dive into this market without fully understanding the relationship between the design file and the machinery. The result is often wasted material, frustrated customers, or a final product that lacks the charm intended by the artist. Whether you are using wood or acrylic, the success of your project hinges on how well you interpret the digital instructions provided with the files.
Understanding the Digital Blueprint
At its core, a Decorative Plant Stakes Laser Cut CNC project begins as a set of vector data. When you purchase a digital package, you are typically receiving a zip archive containing multiple formats: SVG, EPS, PNG, PDF, and DXF. Each of these serves a specific purpose in the workflow. The SVG and DXF files are generally preferred for laser cutting because they maintain vector integrity, allowing the machine to follow precise paths without pixelation. The PNG is useful for visual previews, while the PDF offers a human-readable layout.
A common misunderstanding among beginners is assuming all files within the archive are identical in function. They are not. If you attempt to cut a PNG file, you will likely encounter jagged edges or failed cuts because raster images do not contain the necessary vector paths for the laser head to trace. Always prioritize the vector-based formats when setting up your machine.
The Critical Distinction Between Cutting and Engraving
One of the most frequent errors in producing these garden ornaments involves misinterpreting the line color coding. In many professional design files, including those for whimsical stained glass style stakes, the instructions are explicit: RED lines indicate where to CUT, and BLACK lines indicate where to ENGRAVE.
This distinction is vital for the structural integrity and aesthetic appeal of the final piece. If you engrave along a line meant for cutting, your stake will remain attached to the base sheet, requiring manual separation that can damage delicate details like butterfly wings or snail shells. Conversely, if you cut along an engraving line, you risk slicing through important decorative elements, rendering the design incomplete.
To avoid this, take a moment before starting your job to review your software settings. Most laser cutting software allows you to assign different power and speed settings based on line color. Ensure your red lines are assigned high power and slow speed for cutting, while black lines are set to lower power and higher speed for surface marking. This simple check prevents costly mistakes and ensures every mushroom and caterpillar emerges from the material exactly as designed.
Material Selection and Compatibility
The choice of material significantly impacts the outcome of your Decorative Plant Stakes Laser Cut CNC projects. While the designs are versatile, not all materials react the same way to the laser beam. Wood and acrylic are the most popular choices for these faux stained glass effects, but each requires specific handling.
Wood: When working with wood, such as birch plywood or basswood, grain direction matters. Cutting against the grain can lead to chipping, especially on intricate details like the legs of a caterpillar. Additionally, some woods produce more smoke and residue than others, which can obscure the engraved areas. Always test your settings on a scrap piece first.
Acrylic: Acrylic offers a true stained-glass look, especially when using colored sheets. However, it is prone to melting if the laser moves too slowly. The "faux stained glass" effect relies on clean edges; if the heat melts the plastic rather than vaporizing it, the result will be a cloudy, uneven finish. Furthermore, never use PVC or vinyl, as they release toxic chlorine gas when lasered.
A practical approach is to match the material thickness to the complexity of the design. Intricate patterns with thin lines may require thinner stock (e.g., 3mm) to prevent burning through before the cut is complete. Thicker materials are better for sturdy outdoor stakes but may require multiple passes or adjusted focus points.
Software and Machine Readiness
Even with the perfect file and material, the process can fail if your software and hardware are not compatible. The prompt explicitly warns: "Just be sure your cutting machine and software are compatible." This is often overlooked until the machine refuses to start the job.
Different machines—whether CO2 lasers or fiber lasers—require specific drivers and software interfaces. Some older machines struggle with complex nested designs or specific font kerning found in modern SVG files. Before committing to a large batch production run, perform a test cut on a single unit. Check the alignment of the red and black lines, verify the depth of the engraving, and ensure the cut-through is clean.
If you find that your current setup cannot handle the file format, consider converting the file using vector editing software. Most creators include multiple formats precisely to accommodate different workflows. If you need a specific file type not included in the standard zip archive, reaching out to the designer is a proactive step. Many sellers are willing to provide alternative formats upon request to ensure their customers succeed.
Evaluating Quality and Presentation
The ultimate goal of creating Decorative Plant Stakes Laser Cut CNC items is to produce a product that delights the end user. Whether you are selling these as gifts for plant lovers or using them to enhance your own nursery, presentation is key. Poorly executed cuts or shallow engravings diminish the perceived value of the item.
Consider the finishing touches. After cutting, sanding the edges of wooden stakes removes char marks and creates a smooth surface safe for handling. For acrylic, peeling off the protective film after cutting reveals a pristine finish. Neglecting these steps leaves the product looking rough and unfinished.
Furthermore, think about durability. Outdoor garden markers face rain, sun, and wind. While the laser-cut design is beautiful, the longevity depends on the sealant applied afterward. Using a UV-resistant varnish on wood or ensuring the acrylic is rated for outdoor use will extend the life of your creation.
Making the Right Decision
Before purchasing or downloading any digital design, evaluate your current capabilities. Do you have the right machine? Are you comfortable with vector editing? Have you tested your materials? If the answer to any of these is no, take the time to learn or adjust your setup before investing in expensive materials.
Don't hesitate to ask questions. If a design includes complex features you aren't sure how to handle, contact the seller. A good creator values your success and will guide you through potential pitfalls. Following the shop and staying updated on future releases can also provide access to tutorials and improved file versions that address common issues.
By respecting the technical requirements—honoring the red and black line distinctions, choosing the right materials, and ensuring software compatibility—you transform a simple digital file into a tangible work of art. The result is a charming, durable, and unique addition to any garden that reflects both skill and care.